
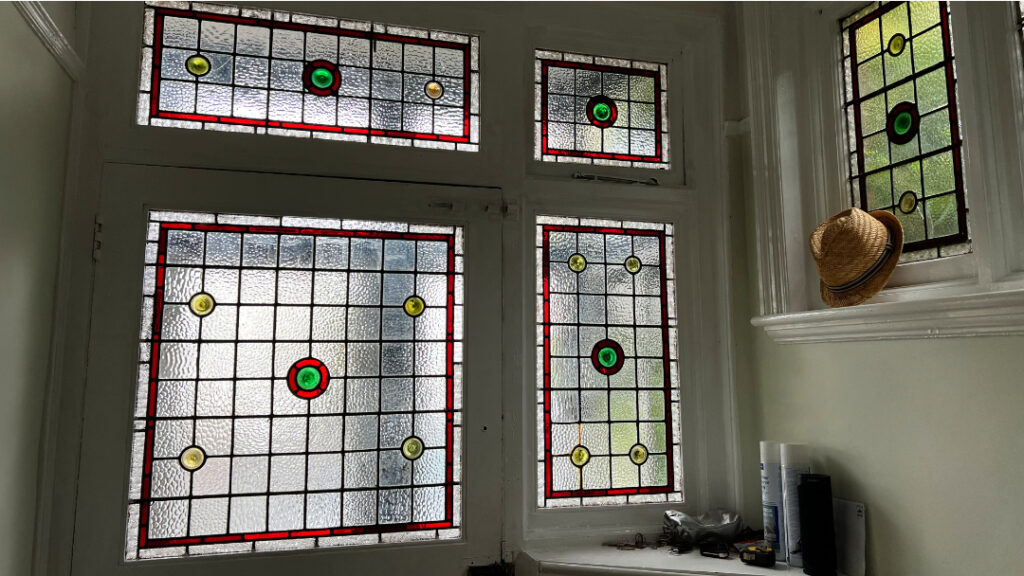
A family who had just bought a beautiful, traditional house in Gosport, Hampshire, invited me to repair their stained glass front door, which was very wobbly and had several cracked pieces of glass.
On my first visit, I assessed the extent of the damage and compared the existing stained and textured clear glasses with samples I had brought with me.
I ascertained that there were two reasons that the door glass was insecure. First, the wire ties on one of the rebars (reinforcing bars often added to secure front door panels) had broken and were no longer supporting the glass. Second, some of the lead at the top of the door had deteriorated and there were several broken pieces of glass.
Where possible, I try to carry out stained glass repairs in situ for homeowners. This approach means less chance of further damage to the old panels when they are removed, as well as saving the client having to pay for the panel to be removed and boarded up or temporarily glazed.
Given the extent of the damage to the stained glass in this front door, I knew I would need to use a variety of techniques to resolve the issues.
I measured and templated the damaged areas so I could cut the stained glass and clear textured glass at the studio before returning to fit the new pieces the following week.
Each cracked or broken piece of glass had to be scored with a glass cutter to enable me to break it into pieces and knock it out carefully. Often there are tiny pieces of glass stuck in the corners, as well as old filler, all of which must be removed before the new glass can go in. As you can imagine, it is a slow and fiddly process!
The lead around each now empty area has to be gently folded back so that the new piece of glass can be fitted. Often, the new glass has to be cut or ground several times to allow it to be fitted into the space. This requires a patient person!
As lead is soft, folding it is a tricky process as it may not fold back well after it has been bent. Luckily I have a selection of tools I use to smooth it back around the new glass. It is a great moment when the finely adjusted glass piece finally fits into the gap!
This removal and replacement process has to be repeated with all the other damaged stained glass pieces. Then specialist filler is used to secure the glass in the leads and keep the panel watertight.
I try to keep all the new work in keeping with the existing stained glass, which means adding a patina to any fresh solder or lead.
In this case, I had to add small pieces of new lead where the old lead had failed at the top of the door.
I also added new wires to the front door panel to replace the broken ones and twisted them round the rebar, restoring its security.
In total, almost 20 pieces of glass had to be replaced on this job and it took three days on site to do the work.
There are a few damaged pieces of stained glass in other panels in their impressive entrance hall, but those are for another day… For now, their new home has a safe and attractive refurbished stained glass front door.


0 Comments