
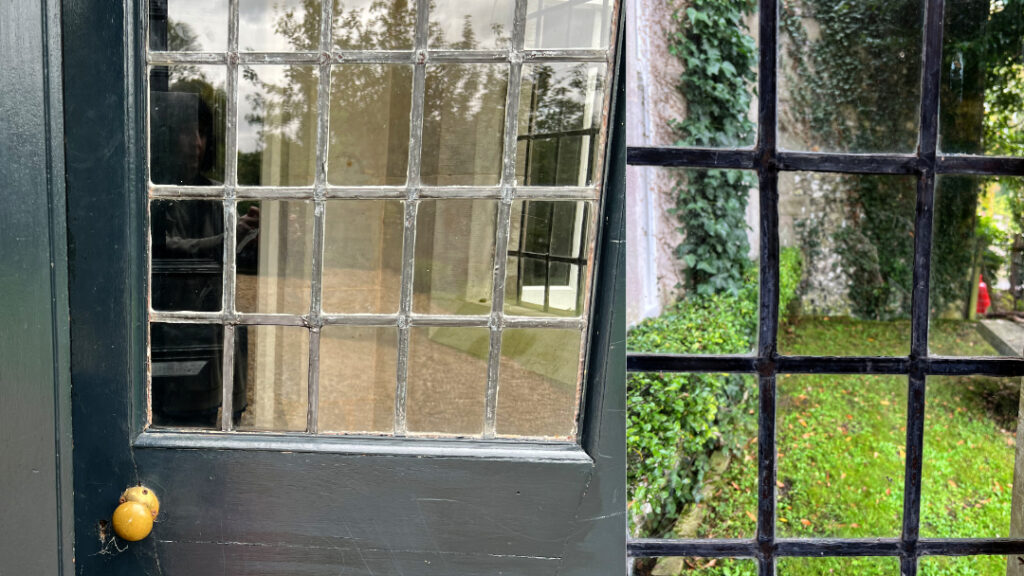
The methods used to repair leaded lights are the same as those to repair stained glass windows and recently I was asked to repair some leaded lights in a porch of a grand old house in Soberton, Hampshire.
There was one broken side panel and two pieces completely missing in the door panel. Clearly these issues were allowing a lot of cold air to get in, as well as looking unsightly.
In this case there were several pieces of lead missing and normally it would be necessary to remove the whole panel to replace the lead. However, I reckoned that I could work out a solution that I could do in situ that would not require the panel to be removed.
After visiting the site to check the type of glass and extent of the damage to the remaining lead in the front door, I measured up and returned to cut some suitable glass in my studio.
Thankfully, the side glass repair was straightforward as there was no missing lead. I carefully removed the existing broken glass and cleaned out the lead channels before refining the replacement glass and fitting it.
The front door repair presented a trickier problem as the lead that remained in the front door around the damaged area had been very mangled. I was able to tease the side lead apart gently so it could take a new piece of glass. The bottom lead was unusable, so I trimmed off the edges. I decided to leave the bottom section of the old lead in the door as there was quite a deep recess. I would use this to support the new lead. Instead of using H-profile lead came, I chose C-profile came. This would support the bottom of the new glass and be about the right height as the existing bottom lead. I always try to work with the existing materials where possible and match new work as much as I can.
I cut new lead strips for the two verticals and trimmed another piece for the missing horizontal piece so it fitted around the existing solder (which was hard and immobile).
Carefully, I fitted the first piece of replacement glass into the existing lead at the side of the door, then added the new vertical lead next to it. The hardest part came next, where I had three pieces of loose lead and needed to fit a piece of glass into them. The new leads had to be folded back to allow the glass to go into the gap. The glass also had to be ground slightly to fit the hole.
It was very satisfying when the glass went in and the new leads could be folded back carefully to secure the glass in place.
Next came some very difficult vertical soldering to secure the leads to the old leads. Definitely not to be recommended ;). Specialist filler was also added around each piece of replacement glass to secure it and ensure it was watertight.
I added a patina to the solder and new lead to help it blend in with the existing lead and gave it all a clean up.
This was quite a challenging project, but I was pleased with the outcome as the repair matched in well with the original lead lights.


0 Comments